| Menyiapkan sebuah ip statis untuk windows XP. If you have a printer, before you begin print out this page! Jika Anda memiliki printer, sebelum Anda mulai mencetak halaman ini!
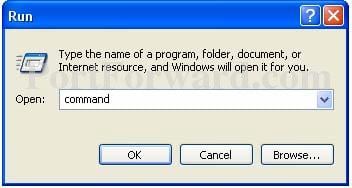
Step 1: Langkah 1:
Open up the start menu, and click Run . Buka menu start, dan klik Jalankan. You should now see the following window. Sekarang Anda akan melihat jendela berikut.
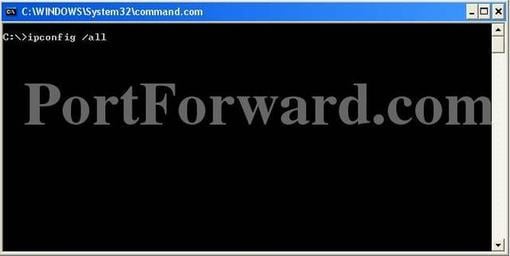
Step 2: Langkah 2:
Type cmd in the Open: box, and click Okay . Ketik cmd di Buka: kotak, dan klik Oke. The will bring up a black command prompt window. Akan memunculkan jendela prompt perintah hitam.
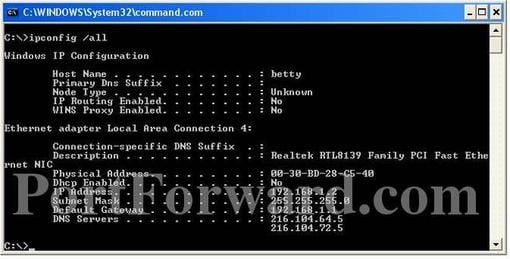
Step 3: Langkah 3:
The command prompt may look different on your screen, but it doesn't really matter. Perintah prompt mungkin terlihat berbeda di layar Anda, tapi tidak terlalu penting. Type ipconfig /all in that window, and then press the enter key. Ketik ipconfig / all di jendela itu, dan kemudian tekan enter. This will display a lot of information. Ini akan menampilkan banyak informasi. If it scrolls off the top you may need to enlarge the window. Jika gulungan dari bagian atas Anda mungkin perlu untuk memperbesar jendela.
Step 4: Langkah 4:
I want you to write down some of the information in this window. Aku ingin kau menuliskan beberapa informasi di jendela ini. Take down the IP address, Subnet Mask, Default Gateway, and Name Servers. Make sure to note which is which. Mencatat alamat IP, Subnet Mask, Default Gateway, dan Nama Server. Pastikan untuk dicatat yang mana. We are going to use this information a little bit later. Kami akan menggunakan informasi ini sedikit kemudian.
The name server entries are a bit complicated. masukan nama server itu agak rumit. Name Server is just another name for DNS(domain name server) server. Some router's act as a proxy between the actual name servers and your computer. You will know when this is the case, because the Default Gateway will list the same ip address as the Name Servers entry. We need to have the correct Name Server IP addresses. Nama Server hanyalah nama lain untuk DNS (domain server nama) server Anda Beberapa router. Bertindak sebagai proxy antara nama sebenarnya server Anda dan komputer. Akan tahu kapan hal ini terjadi, karena Gateway Default akan daftar alamat ip yang sama seperti Nama Server masuk. Kita perlu memiliki Nama Server alamat IP yang benar. If we do not, you will not be able to browse the web. Jika kita tidak, Anda tidak akan dapat menelusuri web. There are a couple ways to get these. Ada beberapa cara untuk mendapatkan ini. The first way is to log into your router's web interface, and look at your router's status page. Cara pertama adalah dengan login ke web interface router Anda, dan melihat status's Halaman router Anda. On that page you should see an entry for DNS Servers, or Name Servers. Pada halaman tersebut Anda akan melihat entri untuk Server DNS, atau Nama Server. Write down the ip adresses of your Name Servers. Tuliskan adresses ip Nama Server Anda. Another way to get the correct Name Servers to use, is to give your ISP a call. Cara lain untuk mendapatkan Nama Server yang benar untuk digunakan, adalah untuk memberikan Anda ISP panggilan. They should know the ip addresses of your Name Servers right off. Mereka harus mengetahui alamat ip Server Nama Anda segera. If they ask you why you need them, you can tell them you are trying to setup a static IP address on your computer. Jika mereka bertanya mengapa Anda membutuhkannya, Anda dapat memberitahu mereka bahwa Anda mencoba untuk men-setup alamat IP statis pada komputer Anda. If they try to sell you a static external ip address, don't buy it. Jika mereka mencoba untuk menjual alamat ip statis eksternal, jangan membelinya. That's an entirely different thing that what you are trying to setup. Itu hal yang berbeda sama sekali bahwa apa yang Anda coba untuk setup.
Type exit in this window, then press the enter key to close it. Ketik exit dalam jendela ini, kemudian tekan tombol enter untuk menutupnya. Step 5: Langkah 5:
Once again open the start menu. Sekali lagi membuka menu start. This time click Control Panel . Ini waktu klik Panel Kontrol.
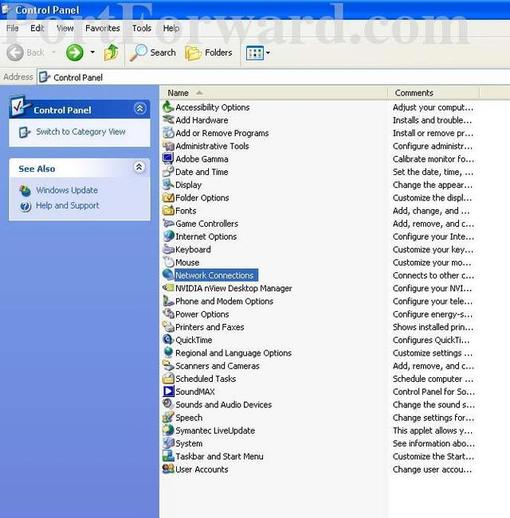
Step 6: Langkah 6:
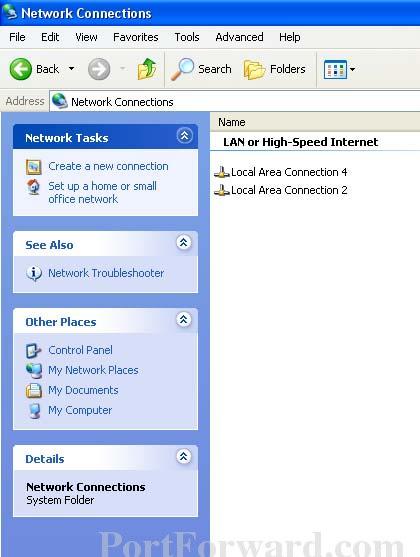
Double click Network Connections . Double klik Network Connections.
Step 7: Langkah 7:
You may have several network connections in this window. Anda mungkin memiliki beberapa koneksi jaringan di jendela ini. I want you to right click on the one you use to connect to the internet. Saya ingin Anda untuk mengklik kanan pada salah satu yang Anda gunakan untuk menghubungkan ke internet. Then click properties . Lalu klik properti.
If you are unsure of which one that is, right click it and then click disable . Jika Anda tidak yakin di mana salah satu yang, klik kanan dan kemudian klik menonaktifkan. Open a new copy of your web browser? Did it open a webpage? Buka salinan baru dari browser web Anda? Apakah itu membuka halaman web? If you can not, then you've found your internet connection. Jika Anda tidak bisa, maka Anda telah menemukan koneksi internet Anda. Close that browser window. Go ahead and right click the network connection again and then click enable . Tutup jendela browser. Silakan klik kanan koneksi jaringan lagi dan klik aktifkan. Once again open up a new web browser. Sekali lagi membuka browser web baru. You should see a webpage. Close the browser window. Anda akan melihat sebuah halaman web. Tutup jendela browser. Right click on the network connection and click properties at the bottom. Klik kanan pada koneksi jaringan dan klik properties di bagian bawah.
Step 8: Langkah 8:
You should now have the above window on your screen. Anda sekarang harus memiliki jendela di atas pada layar Anda. Click the properties button to open up the properties window of this internet connection. Klik tombol properti untuk membuka jendela properti dari koneksi internet. 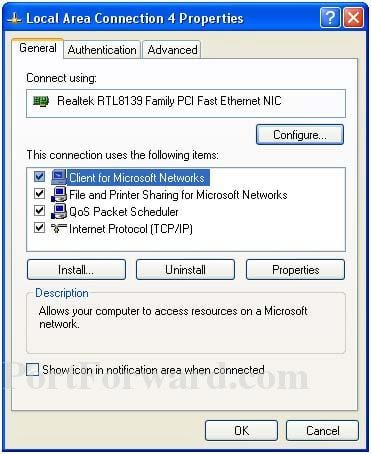
Step 9: Langkah 9:
Click Internet Protocol(TCP/IP) and then the Properties button. Klik Internet Protocol (TCP / IP) dan kemudian tombol Properties. You will now see the following screen. Anda sekarang akan melihat layar berikut.
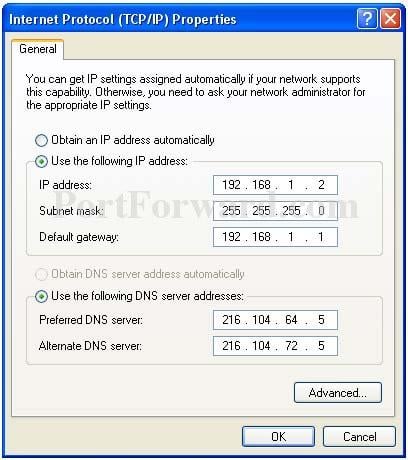
Step 10: Langkah 10:
Before you make any changes, write down the settings that you see on this page. Sebelum Anda membuat perubahan, tuliskan pengaturan yang Anda lihat di halaman ini. If something goes wrong you can always change the settings back to what they were! You should see a dot in the Obtain an IP address automatically box. If you do not, your connection is already setup for a static ip. Jika sesuatu yang tidak beres Anda selalu dapat mengubah pengaturan kembali ke apa yang mereka! Anda akan melihat sebuah titik di Mendapatkan alamat IP secara otomatis kotak. Jika Anda tidak, koneksi Anda sudah setup untuk ip statis. Just close all these windows and you are done. Hanya menutup semua jendela dan Anda selesai.
Pick an ip address and enter it into the IP Address box. The ip address you choose should be very similar to the router's ip addres. Pilih alamat ip dan memasukkannya ke dalam kotak alamat IP Address. Ip Alamat yang Anda pilih harus sangat mirip router ip ke. Only the last number of the ip address should be different. If the router's ip address is 192.168.1.1, I might choose 192.168.1.10. Hanya nomor terakhir dari alamat ip harus berbeda. Jika itu alamat ip router 192.168.1.1, aku mungkin memilih 192.168.1.10. The ip address you choose should end with a number between 1 and 254, and should not be the same as the router's ip address. Alamat IP Anda pilih harus diakhiri dengan nomor antara 1 dan 254, dan tidak boleh sama dengan alamat ip's router. Every device that connects to your network needs to have it's own ip address. Setiap perangkat yang terhubung ke jaringan Anda perlu memilikinya sendiri alamat ip.
Put the subnet mask we previously found in the subnet mask section. Masukkan subnet mask kita sebelumnya yang ditemukan di bagian subnet mask. The default gateway should go into the Default gateway box. Enter the dns servers we prevoiusly found into the two DNS Server boxes. Default gateway harus pergi ke dalam kotak default gateway. Masukkan server dns kita prevoiusly ditemukan ke dalam dua kotak DNS Server. Click okay all the way out of this menu. Klik oke semua jalan keluar dari menu ini.
If you find that you can not pull up webpages, the problem is most likely the dns numbers you entered. Jika Anda menemukan bahwa Anda tidak bisa menarik halaman Web, masalahnya adalah kemungkinan besar dns angka yang Anda masukkan. Give your ISP a call, and they will be able to tell you which dns servers to use. Berikan ISP panggilan, dan akan dapat memberitahu Anda dns server yang digunakan. This is a question they answer all of the time. Ini adalah sebuah pertanyaan mereka menjawab semua waktu. They will be able to tell you what you should use right away. Mereka akan dapat memberi tahu Anda apa yang harus anda gunakan segera.
That's it you should be done! Itu saja kau harus dilakukan! If you can't connect to the internet go back and change your configuration back to what it originally was. Jika Anda tidak dapat melakukan koneksi ke internet kembali dan mengubah konfigurasi Anda kembali ke apa awalnya. |
|
Tidak ada komentar:
Posting Komentar